The HTC Butterfly is the Taiwanese company’s first 5” smartphone. It stands on the border in between smartphone and phablet territory. However HTC markets this as a smartphone rather than a phablet.

When it’s classified as a phablet, it becomes a niche product with a smaller customer base. It is also one of the first smartphones to hit the market packing a full HD screen. Here is our review on the HTC Butterfly, HTC’s first smartphone to feature a 1080p display.
Introduction
Other phones with full HD screens include Oppo Find 5 and Sony XPERIA Z/ZL both of which also have 5 inch screens. HTC first launched the J Butterfly in Japan and then the DROID DNA in USA (Verizon Exclusive). The Butterfly is the international version. Along with the names, there are a few other differences as well in the variants as highlighted below:
J Butterfly
- microSD Card Slot
- Wireless Charging
- Waterproof Display
- LTE (Full Support)
DROID DNA
- LTE (Only 700 MHz)
- Wireless Charging
- Lacks
- Waterproof Display
- microSD Card Slot
Butterfly/Deluxe
- microSD Card Slot
- Waterproof Display
- Lacks
- LTE
- Wireless Charging
Note : The HTC Butterfly will be released under the name of HTC Deluxe in certain regions.
Thus on paper it seems like the HTC J Butterfly is the best among the three. It has all the features while the DROID DNA and Butterfly have features the other lacks. But even then the Butterfly and the DROID DNA are quite capable devices. HTC is rumored to be making a smartphone that build’s further on the Butterfly. It will have the same Full HD screen and many same characteristics but will be more powerful and better equipped. HTC is looking to learn how customers receive the Butterfly and incorporate changes accordingly into the new model. Their recent financial reports haven’t been uplifting and they realize it’s time to make a few changes. So let’s take a look at the Butterfly and see if HTC is headed in the right direction.
Packaging
The HTC Butterfly comes in a rectangular box with graphics similar to the ones found on their recent packaging’s. Here’s a quick unboxing video to show you the box contents.
httpv://www.youtube.com/watch?v=UqbfMTYvDWM
Inside the box we find the basic accessories
- Documentation
- microSIM Tray Ejector Pin
- Earphones
- microUSB Cable
- Wall Adapter
Despite having Beats branding, the Butterfly does not come with a Beats branded earphone. But this was the case with the One X and the One S as well. Nothing to complain about here HTC provide just about everything their competitors do in their packaging.
Design and Build Quality
In terms of design, HTC have followed their recent trend. The Butterfly simply builds on where its predecessors left off. It has a unibody design similar to the HTC One X. The curved body is gone however we still have tapered edges. The phone is 9.1mm at its thickest point and it gets thinner at the edges. This makes the phone easier to hold and also gives us an impression that it is much thinner than it actually is. The sides are flat and not curved like the One X or the Sensation. This however makes it easier to grip the phone.

The phone feels great in the hand. Despite having a primarily plastic construction, it doesn’t have bad build quality. Everything feels solid and there are no creaks or loose parts. It definitely gives you a premium feel when you handle it. The handset fits surprisingly well in the hand making it a joy to carry around. Despite housing a 5 inch screen, the device is no wider than the S III. In fact if you compare the specifications, the Butterfly is actually 0.1 mm narrower than the S III. This is one of the facts that support HTC’s decision to market this as a smartphone instead of a phablet. Despite packing a 5” screen, the device has more in common to smartphones such as S III especially in terms of size even though the Galaxy Note which had a 5.3 inch screen was considered to be a phablet. Although practically speaking it doesn’t make a difference. The phone feels quite comfortable to hold in the hand. The phone weighs 140 grams which is 9 grams heavier than the S III but much lighter than the Note II that weighs in at 183 grams. However because of the larger surface area and good weight distribution, the device feels lighter than the S III. Although the device is a bit long, it will easily slide into most pockets thanks to its slim profile.

Another important thing to note is the camera. It seems HTC have learnt from their mistakes. The One X camera unit was raised quite a bit from the body. This made it quite prone to scratches and smudges. The butterfly on the other hand has the camera lens flush with the body and is surrounded by a chrome ring that is slightly raised. Thus it reduces chances of getting scratched.

The battery is non-removable as in the case of most unibody designs. This poses a lesser worry as compared to the battery capacity of 2020 mAH. We will discuss more about this later on.

The Butterfly is available in 2 colour variants – A black version with red accents (the grille on the sides of the device and the earpiece are red in color) and the black and white version that we are reviewing. The finish is glossy and fingerprints are quite evident on the screen. One the back however fingerprints aren’t really visible unless you look carefully due to the white color. The finish is very similar to what Samsung calls Hyper Glazing. The black variant however, has a matte finish on the back. There might also be a 3rd color variant, a red version like the J Butterfly. However it’s not been confirmed whether the international version will get this color.
Keys and Controls
The front side of the device is dominated mainly by the 5” display. Below the display are the three touch sensitive keys. The one on the left is the return key, the one in the middle is the home key and the one on the right is the recent-apps key (which can also be used as a menu key depending on your settings). I prefer to have some form of physical keys or the other rather than to have on screen controls. On the downside, this leads to larger devices but the Butterfly gives you the best of both worlds. Physical keys at the cost of minimum extra space. They are easily accessible and the backlighting is good and even. Above the display you have the front facing camera on the left. Next to it is the earpiece which is placed below a silver strip. At the right end of the earpiece, you will find the first notification light. It’s quite small and isn’t that noticeable unless you look carefully or you are in a dark environment. Below that you have the proximity sensor and the ambient light sensor.

The right side of the device contains the volume up/down key. There is no dedicated camera shutter key so you will have to rely on on-screen controls to get the job done. The left side is devoid of any keys or controls. Both the sides have a grille mesh pattern that was said to have been inspired by race cars. At the bottom, you have the microUSB port and the primary microphone. The port is covered with a plastic cover which some find useful but others may find it annoying. We find it to be useful to protect dust and dirt from getting in especially since it’s on the bottom. The cover is quite easy to open in case you need to use the port. It is also attached to the body so that you don’t have to worry about losing it.

On the top is where you will find most of the keys, ports and controls. At the left most, you have the secondary microphone that is used for noise cancellation. Next to it is the 3.5mm audio jack. This isn’t protected by a cover. But considering that it is a port, that is very frequently accessed, we stand by their decision of not having one. To the right of the audio jack is the lock/unlock key which also doubles as the power key when pressed and held. We prefer to have the lock key on the right side of the device rather than on the top especially in devices with larger screens since this makes it easier to operate with one hand. However, in this device, it isn’t that difficult. I personally found that the One X was more difficult to lock or unlock. This is because the One X had the key on the top right side while the Butterfly has it in the middle. So the One X key is more difficult to access and puts your finger in a weirder position. The Butterfly however makes the key easier to access and also allows proper control using both left and right hands.

Next to that is the microSIM slot which also houses the microSD card slot. I made a complete fool out of myself by trying to find the microSD card slot only to find out later that it was cleverly placed next to the microSIM slot. They are also protected by a cover which for some reason is really difficult to open unlike the microUSB cover. Granted that we won’t be accessing them as often as the microUSB but there’s no reason to make it difficult to open. We are not sure if this is a problem with the device we have but we will update you as soon as we get our hands on another one.

Inserting the SIM in the device is a bit complex on this. Since the same location houses the microSD card slot as well, HTC were not able to fix the SIM tray onto the plastic cover as seen in the One X or Nokia Lumia 920. Instead you have a cover that opens up. It is still attached to the body so don’t worry about losing it. Then you need a SIM ejector to push the tiny hole. Once this is done the SIM tray gets unlocked and moves upwards. Now getting the tray out of the socket is a bit difficult unless you have long nails. I had to use the ejector itself to pull out the tray. Once you place the SIM on the tray, you’ve to insert the tray back in and push to lock it in place. The microSD is much simpler to insert. Just place the card in the right way and push it in. Just push it again to remove it.

On the back of the device, you have the 8 Megapixel camera. I quite liked the placement of the camera. Especially since the device is longer rather than wider, it’s not easy to accidentally place your fingers over the camera. Thus it has lesser chances of getting smudged by your fingers. To its right is the LED flash and to its left is the second notification light. This light is more prominent and easier to see as compared to the one on the front that sits along with the earpiece. Below it, you have the silver HTC logo that has been embedded onto the body. At the bottom, you have the beats branding and the loudspeaker grille.
Screen
Now we come to the main selling point of the device. Its 5 inch Super LCD3 Display with Full HD 1920×1080 pixels resolution. A display of that size and that resolution results in a pixel density of 441ppi. This gives us super crisp text and images. You might not notice it much until you compare it side by side with a 720p display. Once you do so, you immediately notice the blurring of the edges on the text in the 720p display and then on the difference becomes clear. Since the density crosses the limit at which human beings can distinguish the pixels, everything looks really sharp.

Sharpness is the main attraction here. It’s really good for people who like to read a lot. In terms of contrast however, this being an LCD, it isn’t as good as its competitors such as Samsung. That doesn’t mean that it isn’t good. Just that its contrast isn’t the best we have seen. However with that said, I would go for the resolution over sharpness any day.

Brightness is really good and it’s one of the brighter displays we have seen. Legibility under sunlight is pretty good as well. Anything that is set above 1/3rd of the brightness level is visible under sunlight properly. For those who prefer to use auto brightness, you would be pleased to know that the ambient light sensor works very well and fast in adjusting the brightness for you.

The display is extremely smooth and feels great to use especially with the curved edges. Everything on the front except the earpiece and the strip is covered with Gorilla Glass. Gorilla Glass 2 to be exact. You can expect that the newer smartphones being launched next month at MWC (Mobile World Congress) to feature the newly announced Gorilla Glass 3. We have not performed any tests with the screen yet but we noticed a small hairline scratch on the screen after a day of use. Doesn’t affect screen viewing and it’s barely noticeable unless you look closely, but it’s there. We aren’t sure what caused this or when it occurred. Just something worth mentioning.
Calling and Reception
Opening the telephony app presents you with 4 tabs; Phone, People (Contacts), Groups and Call History. The phone tab brings up the dial-pad and the recent call history.


The size of the dial pad is comfortable even with people with large fingers. However if it isn’t enough, you can choose to bring up the full screen keypad as well. Keying in the number or the name brings up suggestions and you can choose one among them to place a call or send a message.

You can choose sources from where the contacts are to be displayed from. These include phone, SIM, your email account, Facebook, Whatsapp etc. You can also display your contacts according to groups. Finally you have call history where history regarding calls you made and received are stored.
Call quality is great on the HTC Butterfly. We had no issues with noise or loudness. The earpiece provides more than enough loudness without distortion. Same goes for the loudspeaker. We were able to hear the person on the other end fine even in noisy environments and the other party was able to hear us also thanks to the noise cancellation technology. The reception is brilliant as well and there were no issues such as death grip.
A few call related features can be enabled or disabled from the settings. The phone allows you to change to loudspeaker mode just by turning it upside down during a call. You can choose for the phone to ring louder when it is inside your pocket or bag. You can also set it to reduce the volume once you pick the phone up in your hands. All these options can be disabled as well if you choose not to use them.
Software and UI
The Butterfly comes with Android 4.1 Jelly Bean out of the box along with HTC Sense UI 4+. The phone will receive an update to 4.2 Jelly Bean soon although an exact date isn’t available yet.

Sense UI has always been visually stunning. Now Sense UI 4+ makes the experience even better with the help of Jelly Bean. Transitions are really smooth since Project Butter supports 60fps. Couple that with the Full HD screen and you’re golden. Every time I unlock the phone, the weather widget animation just amazes me.


You can of course customize the lock screen to your liking. It supports 10 different lock screen apps such as weather, people, music, photo album etc. You get 4 shortcuts that are customizable to your liking. Just drag and drop the icon of the application you wish to start into the circle and it will automatically launch it for you.


You can choose to have upto 7 different home screens with different widgets, icons and folders in each customizable to your liking. There are already a bunch of preloaded widgets and you can get additional widgets from the Play store. At the bottom you have the dock which has 5 shortcuts out of which four are customizable. The one in the center that opens up the app drawer cannot be changed.


Bringing down the notification area shows you the recent messages, calls and alerts from different application. There is a shortcut to the settings and also a toggle button for the power saver. It also displays the date and time.

Pressing the app viewer button brings up a 3D cover flow like interface that names and displays thumbnails of applications that you used most recently. You can swipe through them and select whichever one you want simply by selecting one. If you wish to close any particular application, all you have to do is swipe the corresponding thumbnail upwards. If you require a more advanced way of displaying the applications that are running, you can open the task manager. It shows you the list of all the applications that are open and the amount of RAM each one is consuming. You can end each application individually or choose to close them all.


At least 1GB of RAM seems to be in use by the OS even when no other applications are open. While this does seem like a lot, it didn’t cause any freezing or didn’t slow down the device even when we had multiple applications open.
Connectivity and Storage
The device takes microSIM which has pretty much become the standard of most phones that are released today so you should be able to get one from your operator as well. In the case, your operator doesn’t carry microSIMs, you can cut it to size and the Butterfly will read them just fine. The Butterfly supports GSM 850/900/1800/1900; HSDPA 850/2100. LTE support is available in the DROID DNA (US Variant Available Exclusively on Verizon) and the J Butterly (Japan Variant).
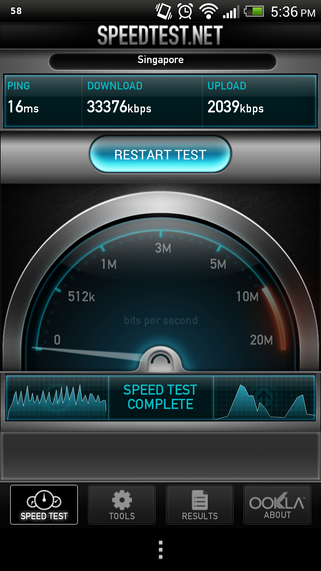
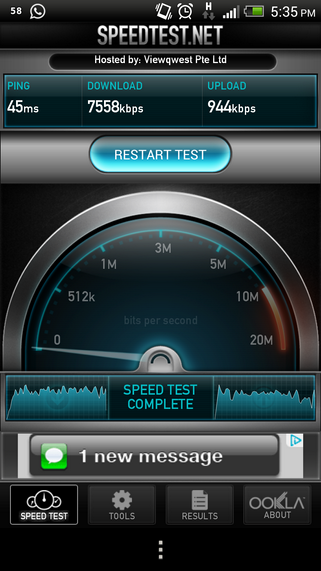
Wi-Fi 802.11 a/b/g/n are supported and we did a few speed tests on both Wi-Fi and cellular data network to check the performance and we were quite satisfied with the results. Wi-Fi works perfectly well and the device isn’t affected by any death grip issues like in the HTC Sensation. The phone can be used to convert your cellular data connection into a Wi-Fi hotspot and that works fine as well. It also supports Wi-Fi direct and DLNA.
The phone has Bluetooth 4.0 and A2DP profile for those of you who like listening to music on their wireless headphones or speakers. It has a microUSB 2.0 that can be used to transfer data between devices and is also the charging port for the phone. Since there is no mini HDMI or micro HDMI port, HTC have been kind enough to make the microUSB port MHL enabled. Thus you can use an MHL HDMI adapter (sold separately) in case you want to stream content through an HDMI cable to your TV.

There’s 16GB of built-in storage out of which 11GB is available to the user. Thankfully HTC learnt from their previous mistake with the One X. The One X which had 32GB (26GB Available to the user) built in memory however it lacked a card slot. A card slot comes better in handy. Gives you more freedom of space, with a 32GB card, your total space on the Butterfly comes up to 48GB and while you don’t get the entire 48GB, it still is a lot more than built in 32GB alone. If you wish, you can have more than one card as well and it also gives you another option to transfer data. HTC states that the Butterfly supports SD cards of upto 32GB. However we managed to get a 64GB card working fine on it. Effectively you get 59.46GB on top of the 11GB built in memory giving you a total of 70.46GB. We aren’t sure why HTC advertised it as just 32GB. Perhaps all cards above 32GB might not work or perhaps it slows down the device. But when we used it, the device worked fine. Either way it’s a good thing to have.

Music and Sound Quality

Beginning with formats, the Butterfly supports most common audio formats such as MP3, eAAC+, WMA and WAVs. Once you open up the music player, you are presented with 4 options/sources of music to choose from. First being music that you have transferred onto your phone, the second is Soundhound and then you have 7digital and TuneIn Radio.

TuneIn Radio and 7Digital are both online radios that allows you to choose from a wide range of channels. Soundhound is a music recognition software. Whenever you want to know the name of a song or the artist, just start it up and hit the button. In a few seconds, Soundhound records the sound and searches online for any matches. If it does find a match, it gives you the details of the track and also lists out sources where you can listen to it. If you do not have an internet connection at the time, you can still record a sample of the track. Soundhound will store it in its database and you will be able to search for a match later on when an internet connection is available.


Once you click my phone, you launch the music player and have access to all your music. There are several different ways in which you can group the tracks. You can choose to view them in terms of Genre, Albums, Artist, Playlist, Songs or Folders. You have the ability to create your own playlists. Alphabetical scrolling is supported to make it easier to find a track. You can also search for the title you are looking for. The now playing screen shows you the album art along with rewind/previous, play/pause and fast forward/next controls. You also have shortcuts to enable shuffle and repeat all/repeat one.


Hitting the options button allows you to view album details, add the track to a playlist, share the track, set it as a ringtone or search. There’s a shortcut to Soundhound that allows you to get more information on the particular track if you need it. The menu allows you to add the song to a queue, update the album art, see the track details and even select a player over Wi-Fi or Bluetooth. You can choose whether to update the album art for just that particular track or for your entire collection. You can also enable auto updating of album art.


If you lock the phone, while the music is playing or music player is active, the music player widget automatically appears in the lockscreen. This happens regardless of the lockscreen you have set it to as default. Thus allowing you to control the music player without the need to unlock the phone. If you find this option unnecessary, you can disable it from the settings.


The Butterfly carries the beats audio branding. This is more of a software thing. Beats audio can be enabled when you use headphones. Enabling it boosts the volume and bumps up the bass. Audio quality is pretty good while listening it through earphones or headphones. The loudness levels are more than sufficient as well. However the loudspeaker fails to impress, both in terms of loudness and clarity. We found the speakers in the Note II or more recently the Lumia 920 was much louder and cleaner. This was a problem in the One X as well and it seems that the Butterfly has carried this over. Even the positioning of the loudspeaker isn’t ideal. Placing it on a flat surface blocks the speaker and muffles the sound.

Imaging
Specification wise, the camera is pretty similar to the One X. 8 megapixels with a maximum resolution of 3264×2448 pixels with autofocus and LED flash. Video recording tops out at 1080p resolution 30 fps with stereo sound and video stabilization. Launching the camera application automatically bumps ups the screen brightness so that you can see everything clearly and won’t have to squint at the screen if the surroundings are bright.

Even the interface hasn’t changed much, you’ll get the following on the left side:
- Flash Auto/On/Off Toggle
- Camera Switcher (To switch between front and back cameras)
- Settings
- Shot Mode
And on the right side:
- Effects
- Shutter Key
- Record Key
- Gallery Shortcut

You can hold the phone in any orientation and the icons will rotate to fit accordingly. You cannot use the volume rocker to zoom in/out. Instead, you have to zoom in and out by using the zoom slider on screen.
To take a photo, you either tap on a point in the picture to focus on it and then click the shutter button. You can also press the shutter button and the camera will take the photo automatically after focusing. If you press the shutter button and hold it, you’ll shoot images in burst mode. If you hit the record button, video recording will start but the shutter button remains active. So you can click photos as the video is being captured too.

There are two more methods to capture a photo too. You can enable them within the settings. The first one enables touch to capture. In this method, the camera automatically takes a photo after focusing on a point within a frame you selected. The second is smile activated shutter, this takes a photo after your subject smiles.
The gallery button takes you to the photo that you captured last. Effects button gives you access to a wide range of special effects to apply to your photos. This makes it easier rather than editing the photo and adding the effects later. Effects include:
- Vignette – Adjustable
- Distortion
- Depth of Field – Adjustable
- Dots
- Mono – The Hue is Adjustable
- Country
- Vintage (Regular, Warm or Cold)
- Greyscale
- Sepia
- Negative
- Solarise
- Posterise
- Aqua
Flash can be turned on or off or left on auto allowing the phone to choose when to use the flash depending on the conditions. The camera switch changes between front and back cameras.
Under the settings menu, you have a wide range of customizations. Starting with:
- Self Timer – Upto 10 seconds
- Aspect and Resolution – If you need to get the photo at maximum resolution, then you need to choose 4:3 aspect ratio. However if you prefer widescreen, you can take photos at a maximum of 3264×1840 pixels.
- Video Quality – Full HD (1920×1080 pixels), HD Ready (120×720 pixels) and other smaller sizes
- Review Duration – You can choose whether you would like to review the picture you clicked automatically or whether to manually check them through the gallery.
- Image Adjustments – Allows you to tweak exposure, contrast, sharpness and saturation. (A range from – 2 till + 2)
- ISO – From 100 – 800 or Auto
- White Balance – Incandescent, Fluorescent, Daylight, Cloudy or Auto
- Continuous Shooting – You can choose to turn this option on/off in case you want to prevent accidentally taking many photos. You can also choose whether to apply a limit of 20 photos at a single burst and whether or not to review them after they’re taken.
- Camera Options – Allow you to toggle features such as touch to capture, face detection, Smile capture and Geo-tagging of photos.
- Video Options – Toggle video stabilization, audio and stereo recording.
- Camera Interface – To display a grid to assist you with placing your subjects and objects. Also to enable or disable shutter sounds.
Note – The feature to disable might not be available everywhere. It depends on your country’s rules and regulations.
One issue that we faced is recording a video when the image aspect ratio is set to 4:3. Since the interface does not switch to a separate video recording mode, you are still able to see the image in 4:3 aspect ratio while the video you’re recording is in 16:9. This causes problems when you are framing the video. So if you want to avoid this issue, you will have to set image aspect ratio to 16:9 before recording.
The image quality is pretty good and with good detailing. Having an aperture of 2.0 means the lens lets in more light. This also helps for night time/low light photos. However even though there’s adequate amount of light, the pictures do turn out a bit noisy. Nothing close to what the Lumia 920 can achieve. Here are some samples that we have taken using the camera in auto.


And here is one taken with a few adjustments ie tweaking the sharpness, saturation, exposure and contrast.

HDR mode allows you to take images with a good dynamic range if you like photos to be vivid and colorful. However we noticed that it can get a bit slow at times and thus resulting in a blurry image. Take the images below for example. The photo on the left was taken with HDR turned off and as a result the image is fine and sharp. But the one on the right is blurry. Granted that this particular image was taken at night with less light, we still had problems even when taken during the day.


However if you do have a steady hand, it should be fine like the image below.

Here are a few samples taken using different effects.


Here is a video sample taken at night :
httpv://www.youtube.com/watch?v=o-eqeyK3iLg&feature=youtu.be
Battery Life
This was one of my main concerns when I saw the spec sheet. The One X had an issue with its battery capacity and as a result its battery life wasn’t very good. The One X had just 1800 mAH and HTC later addressed this issue among other things when it launched the One X+. Battery capacity was increased to 2100 mAH. So seeing as how the Butterfly had just 2020 mAH to power itself, it was quite worrying especially considering the bigger screen with a much higher pixel density.
![]()
Of course battery capacity isn’t everything; optimization is a key factor too. I didn’t believe it would do well until I actually used it. Surprisingly, the Butterfly provides quite good battery. When I describe my times in terms of hours, do not compare it to the times you get. You might get more or less depending on your use, your settings and also your network. Even with the same use and same handset, I get different battery life depending on the location and network. So I’ll give a comparison between different phones and the battery life I got from them on the same network.


These times are with 3G or higher enabled all the time with occasional Wi-Fi usage. Brightness set to minimum indoors and maximum outdoors. I got around 11-13 hours of battery life from the One X. Anything that provides over 16 hours of use is good in my book. S III lasted between 16-18 hours. The Note II gives 18+ hours easily. The Butterfly provides around 15 hours and it still has juice to last you for a while longer. Although it’s not as good as the Note II or the DROID RAZR MAXX, it’s very similar to the Galaxy S III and that’s quite a good achievement. Despite having a larger screen, more pixel density and a smaller battery, the Butterfly yields similar results. Of course the S III is using a Super AMOLED whereas the Butterfly uses a Super LCD3 but the battery usage has been optimized quite well.
Conclusion
The HTC Butterfly is one of the first smartphones in the world to sport a full HD display and that will remain its main selling point. But apart from that it’s also proven to be a decent all rounder. It does have a few shortcomings but its advantages outweigh them. It won’t be HTC’s flagship model for the year since newer models particularly the M7 is rumored to be announced next month. But it still is one of the most feature packed and best performing smartphone in the market today and just shows us that HTC is on the right track. If you’re looking for a high end smartphone that performs well and has a great screen, this might be your best bet.
Pros
- Sense UI 4+
- Fast Performance
- Brilliant Full HD Screen with Great Sharpness and Outdoor Legibility
- Aesthetical Design
- Build Quality
- Dual Notification Lights
- Covered Ports
- Call Quality and Reception
- Audio Quality (Through 3.5mm Audio Jack)
- Battery Life
Cons
- Complex SIM Tray
- Average Loudspeaker
- Noisy Low Light Camera Performance
- Slow HDR Mode